Showing posts with label Recipe. Show all posts

Monday, March 26, 2018

Chocolate Peanut Butter No-Bake Cookies

Chocolate Peanut Butter No-Bake Cookies
Well, it was back to real life today after a very fun Spring Break Adventure.

I keep looking back at the blog posts from our trip and trying to remember every detail.

In case you missed them, here are the blog posts from our trip:

It was a rainy day at my house this afternoon and rainy days mean one thing - cookies!

I didn't have a lot of time so I made no-bake cookies. This is the best recipe for no-bake cookies. They turn out perfectly every time.


Yield: 24 cookiesPin it

Chocolate Peanut Butter No-Bake Cookies

Everybody has a no-bake cookie recipe, but this one is the best! It turns out perfect every time - thick and fudgy, never chalky or dry.
prep time: 10 MINScook time: 1 MINStotal time: 11 mins

ingredients:


  • 3 cups quick oats
  • 1/4 cup (1/2 stick) butter
  • 1 1/2 cups sugar
  • 1/4 cup cocoa powder
  • 1/2 cup milk
  • 2/3 cup peanut butter
  • 1 Tbsp vanilla

instructions


  1. Pour quick oats into a large bowl.
  2. In a medium sauce pan, combine butter, sugar, cocoa powder, and milk. Heat on medium until boiling. Boil for exactly 1 minute. Remove from heat and add in peanut butter and vanilla.
  3. Pour chocolate mixture over oats and mix well. Let sit 5 minutes then stir again. 
  4. Drop by tablespoon (I use a cookie scoop) onto wax paper. Allow to cool. 

notes

If you don't have quick oats, you can use old-fashioned oats and pulse them in a food processor a few times to cut them smaller.

Be sure you save this recipe so that you can find it later because you will definitely want to try this sweet treat!


Thursday, March 22, 2018

Chicken Pie

Chicken Pie
When we were at Heather and Stephen's house last weekend, Heather let us cook in her beautiful new kitchen. We made chicken & dumplings, chicken pie, and peach cobbler. I'm going to share all these recipes with you but today I wanted to start with the recipe for chicken pie.


This recipe is very versatile. You can make the same basic recipe into chicken and dumplings or chicken pie just by adding a crust or you can add any cooked vegetables that you like.

Whether you're making chicken pie or chicken and dumplings, the first step is to boil the chicken. I like to use 3 or 4 large chicken breasts but you can also use a whole chicken. If using breasts, you will want ones with bone and skin so that you can make a nice broth. 


After the chicken is cooked, remove it from the pot and place it on a plate or pan to cool. 

If you have a food processor, you can use it to mix up the dough. Just put the flour, salt, and Crisco shortening in the food processor and slowly add about 1 cup of broth until the dough forms a ball. If you don't have a food processor, you can use a pastry blender or two sharp knives to make your dough.


Now we roll out the dough! I like to put wax paper on my surface before I roll out my dough. Use a wet washcloth to dampen your surface before you put down the wax paper so that it will not come up while you're working with your dough. Be sure to use plenty of flour underneath your dough so that it will not stick to the wax paper. 


You want to roll out the dough very think. Back in the day, they used to say to roll it out so thin that you could read the newspaper through it. We rolled it out so thin that you could see the granite pattern through it. I think that's close enough.


You can either use a pizza cutter or a sharp knife to cut the dough into thin strips. I usually make my strips about 1 inch X 2 inches. They don't have to be perfect. 


Bring your broth to a full rolling boil then drop your noodles into the pot. You will want to drop the noodles where the broth is boiling the hardest. This is so that the noodles don't stick together. You can very gently stir the noodles around a few times while you're adding them. Cut your chicken into bite-sized pieces. You can use a pair of kitchen shears to do this or you can shred the chicken by hand. 


While the dumplings are cooking, you can get your pie crusts ready. I used a refrigerated pie crust but you can certainly use your favorite pie crust recipe. You will need two crusts for this recipe. Spray the bottom and sides of your baking dish well with cooking spray, then use one crust to line the bottom of your baking dish. Bake in a 350 degree oven for approximately 10 minutes. 


Fill your dish with cooked noodles, cooked chicken, and plenty of sauce, then layer the other pie crust on top. Be sure to pierce the top pie crust with a fork a few times to let the steam out. 


The chicken pie will need to cook for about 20 minutes until it reaches a golden brown color. This recipe makes enough for two chicken pies but you can leave off the pie crusts and have a big batch of chicken and dumplings. 


You can serve this delicious chicken pie with cornbread or a side salad for a full meal. 


Yield: 2 piesPin it

Chicken Pie

Homemade chicken pie is the ultimate comfort food. Made with simple ingredients, this recipe is one that the whole family will enjoy.
prep time: 1 hourcook time: 1 hour and 20 MINStotal time: 2 hours and 20 mins

ingredients:


  • 1 large fryer or 3-4 large chicken breasts
  • 2 cups flour
  • 1 tsp salt
  • 1/3 cup Crisco shortening
  • about 1 cup chicken broth
  • 2 refrigerated pie crusts

instructions


  1. Boil chicken in salted water and debone. Make sure you have plenty of broth. 
  2. Add flour, salt, and Crisco to food processor then slowly add broth until the dough forms a ball. You should use approximately 1 cup of broth. 
  3. Roll out very thin on floured surface (so thin you can read a newspaper through it). Cut into strips approximately 1" X 2".  (I use a pizza cutter.)
  4. Drop into boiling broth then add chicken.  Cook on low heat 12-15 minutes until sauce thickens.
  5. Unroll 1 pie crust and place into the bottom of a greased round baking dish. Fill with chicken, dumplings, and sauce. Top with remaining pie crust. 
  6. Bake in 350 degree oven for 20 minutes or until golden brown. 

notes

Serve with cornbread and a green salad.


Be sure to save this recipe so that you can find it later! You will not want to miss out on this one.


Shop this recipe


Have you ever eaten homemade chicken pie?

Saturday, March 17, 2018

Reese's Peanut Butter Bars

Reese's Peanut Butter Bars
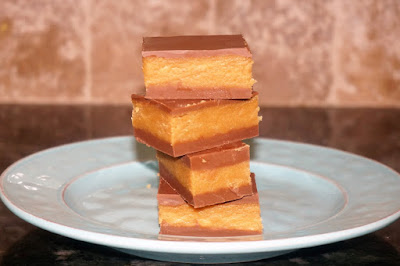
Reese's bars are one of our family-favorite treats to make at Christmas time. I remember making these with my sister when we were kids. Since I was headed to visit my family this weekend, I thought I would whip up a batch to take with me to surprise them.

One of the secrets to this recipe is using a good, old-fashioned peanut butter brand like Jif, Skippy, or Peter Pan. Natural peanut butters do not work well in this recipe.

Reese's Peanut Butter Bars Recipe

The other secret is in the chocolate chips. I always use a high-quality semi-sweet chocolate, like Ghirardelli or Nestle Toll House. You could also use a milk chocolate if you prefer.

I think it's easiest to make the Reese's into bars but you could use the same recipe and shape them into balls or eggs before dipping into melted chocolate. When we were kids, we used to make them into bars so that's always going to be the classic for me. We used to just do two layers - the peanut butter filling with a layer of chocolate on top. The last few times I've made this recipe, I added the layer of chocolate to the bottom to make the bars easier to stack and store. 

When I make the bars, I line my pan with parchment paper and leave plenty hanging over the sides to use as handles so that I can take the whole slab of bars out of the pan and transfer them to a cutting board before I cut into squares. 


Stack of Peanut Butter Bars


Yield: 24 barsPin it

Reese's Peanut Butter Bars

This classic recipe for Reese's Peanut Butter Bars is a delicious treat made without graham cracker crumbs. The peanut butter filling can be shaped into peanut butter balls or peanut butter eggs before dipping into melted chocolate.
prep time: 1 hour and 15 MINScook time: total time: 1 hours and 15 mins

ingredients:

For peanut butter filling
  • 1 1/2 cups peanut butter
  • 2 sticks margarine
  • 1 lb (3 1/2 cups) powdered sugar
For chocolate topping
  • 4 cups chocolate chips (divided)
  • 4 Tbsp margarine (divided)

instructions

Layer 1
  1. Melt in microwave 2 cups chocolate chip with 2 Tbsp margarine. Stir well then spread into 9X13 pan. Chill 15 minutes. 
Layer 2
  1. Melt together in microwave peanut butter and 2 sticks margarine. Add powdered sugar and mix well. Spread on top of chocolate layer. Chill 15 minutes. 
Layer 3
  1. Melt in microwave 2 cups chocolate chip with 2 Tbsp margarine. Stir well then spread on top of peanut butter layer. Chill until firm.

notes

Use high-quality peanut butter brand like Jif or Skippy. Natural peanut butters do not work well for this recipe. Peanut butter filling can be shaped into balls or eggs before dipping in melted chocolate. 

Chill 30 minutes then cut into squares.


Don't forget to save this recipe so that you can find it later!

Reese's Peanut Butter Bars Infographic

Do you prefer your Reese's peanut butter bars with graham cracker crumbs or without?

Monday, March 12, 2018

Easy Crispy Apple Fritters

Easy Crispy Apple Fritters

The hot and crispy apple fritters at the local donut shop are one of Mike's favorite pastries. He's been asking me to make some at home for quite a while so Emily and I gave it a shot last weekend. Everybody at my house likes recipe testing because they get to eat the results. 


The apples are the real star in this dish. For this recipe, I used Granny Smith apples and chopped them up very finely, even more finely than what's shown in this picture. Then the addition of apple juice and loads of cinnamon really make this recipe WOW.


I think the key to crispy fritters is having the correct oil temperature. Shoot for 375 degrees or medium-high on your dial. The apple fritters will fry up fairly quickly at this temp but they will turn out crispy and delicious.


The apple juice glaze is the perfect little addition to this recipe. You can dip both sides of the fritters or just one. I opted for dipping one side only and they were perfect.


These fritters were a huge hit with my family and I have a feeling they'll be asking me to make these again very soon. They were so easy that I'd be happy to oblige!


Try this recipe today and let me know if you love it, too.


Yield: 3 dozen frittersPin it

Easy Crispy Apple Fritters

Apple juice and loads of cinnamon really kick this fritter recipe up a notch. And it's much easier than you'd think. Try this on Saturday morning and impress your whole family.
prep time: 15 MINScook time: 20 MINStotal time: 35 mins

ingredients:

For the Fritters
  • 2 cups all-purpose flour
  • 1/2 tsp salt
  • 3 tsp cinnamon
  • 1/4 tsp apple pie spice or nutmeg
  • 1 tsp baking powder
  • 1/4 cup sugar
  • 1 1/4 cups buttermilk
  • 1 cup apple juice
  • 2 eggs, separated
  • 3 tart apples, finely chopped
For the Glaze
  • powdered sugar
  • apple juice

instructions


  1. In a large mixing bowl, stir together flour, salt, cinnamon, apple pie spice, baking powder, and sugar. Add in egg yolks, buttermilk, and apple juice. In a small bowl, beat egg whites until stiff peaks form then gently fold into fritter batter. Fold in finely diced apples.
  2. In a small bowl, stir together powdered sugar and apple juice into a thin icing consistency. Set aside. 
  3. Heat oil in a heavy skillet to 375 degrees or medium-high. Drop batter into hot oil using a large spoon or metal cookie scoop. Cook until golden brown then flip. Remove crispy fritter onto paper towel to drain.
  4. Let fritters cool slightly then dip into glaze. Dip one side or both!

notes

Best served hot.


Wednesday, March 7, 2018

Fudgy Brownies

Fudgy Brownies
How was your Wednesday?

I was not planning to post about brownies tonight but some things you just have to share.

After Noah got home from school, he helped me whip up a pan of brownies for dessert. We'd done really well getting together all the wet ingredients and he helped me stir it all together. 


Then he was helping me read the recipe on my phone and I was getting the dry ingredients out of the cabinet for him. I'd put the flour in the bowl and was digging through the cabinet looking for the baking soda when a can of baking powder fell into the brownie bowl. The flour went all over Noah - on his shirt, on his face, in his ear!


I'm probably pretty lucky that he wasn't super mad at me since it was all my fault, but he thought it was hilarious! I recorded a little video of him for your viewing pleasure. 


Don't tell me you didn't smile while you were watching that excited little boy.


Despite all the flour we lost, we did end up getting the brownies baked up and they turned out great. They only take 30 minutes to bake so it's perfect for those busy weeknights. 


They are perfect with a tall glass of milk. We were a bit low on milk tonight though so we didn't do that. 


And I can vouch for this one  - they're also very good with a scoop of ice cream and some caramel sauce drizzled on top. Doesn't that look wonderful?


Yield: 12 pieces 

Rich, Fudgy Brownies

These brownies are so rich and fudgy that they don't require any frosting. And they are easy to make in one bowl, no mixer required. How much easier can you get?
prep time: 10 MINScook time: 30 MINStotal time: 40 mins

ingredients:


  • 6 T. cocoa powder + 1 T. oil
  • 1 c. (2 sticks) margarine
  • 2 c. sugar
  • 4 eggs
  • 1 1/2 c. flour
  • 1 t. baking powder
  • 1 t. salt
  • 2 t. vanilla
  • 1 c. chopped nuts

instructions


  1. Mix cocoa and oil. Add margarine and melt in microwave.
  2. Cool slightly. Add sugar and eggs, mix well.
  3. Add flour, baking powder, and salt to the chocolate mixture.
  4. Stir in nuts and vanilla.
  5. Pour batter into a greased 13 X 9 inch pan.
  6. Bake at 350 degrees for about 30 minutes.


Don't forget to pin this recipe so that you can find it later!


Do you prefer brownies with icing on the top? Or do you think the icing is unnecessary? No icing for me!

Saturday, March 3, 2018

Make-Ahead Tater Tot Casserole

Make-Ahead Tater Tot Casserole
How was your Saturday?

We had a good day babysitting for a friend. We call it baby time. Noah is already asking when we can have baby time again. I totally agree! It was a lot of fun.

For supper tonight, I made a family favorite - Tater Tot Casserole. This is a recipe that's so easy to make but everyone in my family will happily eat it. That's not something that happens around here every day! My kids are pretty good eaters though.

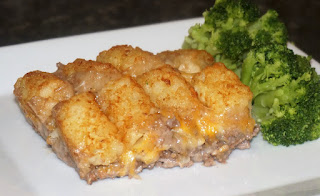
Make-Ahead Tater Tot Casserole on plate

Sometimes I make this with only one can of cream of mushroom soup. A lot of times, it just depends on what I have in the pantry. This is one of those meals that are totally customizable. You could easily add onions to the ground beef or add additional spices. For my family, I like to keep it simple. It's really delicious. 


Tater Tot Casserole

Don't the golden tater tots and melty cheese look glorious? This is a definite must-try recipe!


Yield: 12 servingsPin it

Easy Make-Ahead Tater Tot Casserole

This family favorite is easy to put together and can be made ahead and refrigerated until it's time to bake.
prep time: 15 MINScook time: 45 MINStotal time: 60 mins

ingredients:


  • 2 lbs ground beef hamburger meat
  • 2 (10 ounce) cans cream of mushroom soup
  • 2 cups grated cheddar cheese
  • 1 (2 lb) package frozen tater tots

instructions


  1. Preheat oven to 350 degrees. 
  2. Brown ground beef and drain well. 
  3. Mix ground beef and mushroom soup then spread into greased 13X9 casserole dish.
  4. Sprinkle cheese on top of ground beef. Top with tater tots. 
  5. Bake uncovered 45 minutes. 

notes

Serve with sour cream and/or ketchup.


Don't forget to pin this recipe so that you can try it later!


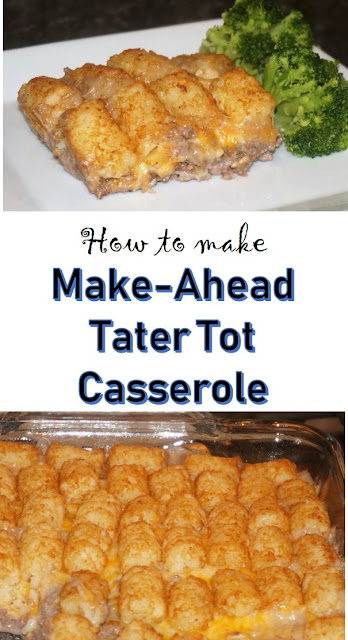
Make-Ahead Tater Tot Casserole Pin


Have you ever made Tater Tot Casserole? Did you add-in anything else to it? What do you serve it with?


Related Posts Plugin for WordPress, Blogger...