The other week, Emily had to make an ocean biome in a shoebox for her science class. She put a lot of thought into how she wanted her biome to look and I thought it turned out really neat. It even had a stingray that moved!
In case you're curious, these are the supplies that we used and how we put it together.
For the box, we just used a cardboard shipping box. I cut the flaps off. The first thing we did was cover the outside with colorful wrapping paper so that the box would look "finished" on the inside as well as the outside. Just wrap it like you would wrap a gift and tuck the ends of the paper inside the box. The inside of the box will get covered up so it doesn't have to look neat.
Next, Emily took some printed scrapbooking paper that had a water pattern on it. We got two pieces of 12X12 paper and we needed probably twice that much. We could only cover the back and sides of our box, but not the top or the bottom. We just used white printer paper for the top and bottom. Just fold the paper and glue it down with white school glue.
For the coral reef on the left side of the box, I printed a picture of some coral off the internet and pasted it to a small piece of cardboard. Then Emily cut the cardboard/picture and pasted it onto the bottom of the box. We had gotten some
small plastic ocean animals
from Hobby Lobby as well as some
small fake plants
. These are sold in the hobby section of the store and are things that are used to make miniature models and things like that.
The animals that we got were made of a squishy plastic, sort of like a pencil eraser. Since they were soft, I was able to use a needle to thread a piece of fishing line through the back of the animal so that we could suspend them in the box to make them look like they're swimming.
The "sand" at the bottom of the ocean is actually brown sugar that we glued to the box with white school glue. We also added some pieces of cardboard to make the ocean floor look uneven. We attached some turtles to the seafloor using hot glue as well. We made the mistake of trying to hot glue the turtle to the floor after we'd put on the sand, but the turtle kept falling off. We eventually had to scrape some of the sand/brown sugar and hot glue the turtle down and then add more brown sugar around it. So, don't do like us and make sure you attach your animals before you add the sand.
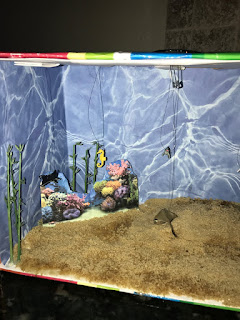
Another fun thing that Emily wanted to do was make a stingray that could cruise across the ocean floor. I cut a slit into the top of our box to facilitate this. I used the needle and fishing line to attach the stingray, then tied the finishing line through the holes of a large button. Then we threaded the stingray through the slit in the top of the box. The problem was that the thin fishing line would not travel smoothly through the slit in the box. So, we added a small safety pin that would add more stability as it slid down the slit in the box. We also put scotch tape all along both sides of the slit in the box to help the safety pin move more smoothly. This did the trick! We used hot glue to attach a starfish to the top of the button.

All the kids in Emily's class thought it was pretty cool that her stingray moved. That little button contraption has gotten a lot of use and is still going strong. (Perhaps I should sell it on EBAY? I could probably get a lot of money for it!) She said that none of the other kids had animals that moved in their biome box.


