Showing posts with label Recipe. Show all posts

Saturday, May 20, 2017

Mexican Conchas (Sweet buns)

Mexican Conchas (Sweet buns)
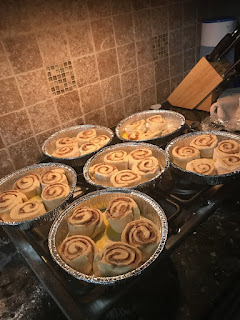
When I was looking for some Mexican-inspired desserts for Mike's potluck, I ran across a recipe for Mexican Conchas. Have you ever heard of these? They are sweet buns. They looked so cute and fairly easy to make so I decided to go for it.


I love the shell designs on top and also the colorful topping. That is not something you see everyday.


Emily and I have really gotten a lot of use out of the new Kitchenaid mixer. We've made a lot of yeast dough recipes lately. And frosting. And some cookies. And on and on. 

What should we make next?


Yield: 16 bunsPin it

Mexican Conchas Sweet Bread

Mexican Conchas are traditionally found in Mexican markets and are named for the shape of their topping, which looks much like a shell. Use your imagination to come up with the shell designs. Perfect for Cinco de Mayo celebrations.
prep time: 2 hourcook time: 20 MINStotal time: 2 hours and 20 mins

ingredients:

Sweet Buns
  • 1 package active dry yeast
  • 1/2 cup warm water (110 - 115 degrees F)
  • 1/2 cup lukewarm milk (110 - 115 degrees F)
  • 1/3 cup granulated sugar
  • 1/3 cup butter, room temperature
  • 1 tsp salt
  • 1 egg
  • 3 1/2 cups all purpose flour
Sugar Cookie Topping
  • 1/3 cup granulated sugar
  • 1/4 cup margarine
  • 1/2 tsp vanilla
  • 1/2 cup all purpose flour
  • gel food coloring

instructions

To Make the Buns
  1. Dissolve yeast in warm water in the bowl of stand mixer. Add milk sugar, butter, salt egg, and 2 cups of flour. Stir together until well combined. 
  2. Switch to the dough hook attachment and add the rest of the flour. Knead on medium speed for 3 minutes until the dough pulls away from the side of the bowl. Add more flour, if needed. 
  3. Place the dough in a large, oiled bowl and turn the dough over to coat both side. Cover with greased plastic wrap and place in warm place to rise until doubled in size. 
To Make the Sugar Cookie Topping
  1. beat the sugar, margarine and vanilla until light and fluffy. Add flour and mix until thick. Divide dough into three equal pieces and place each piece in a plastic sandwich bag. Add a few drops of food coloring gel and squish the dough until evenly colored. You may need to add more flour if the dough is too soft.
  2. When the dough has risen, divide it into 16 even pieces. Form each piece of dough into a bun by tucking the corners under. (Do not roll between palms because this will make the dough tough.) Place the buns onto a baking sheet lined with parchment paper. 
  3. Take the sugar cookie topping and divide into 16 even pieces. Take each piece of dough and press it between your palms until it forms a cookie disc shape. Moisten one side slightly and place it on top of each bun, wet side down. This will help the topping adhere to the bun. Use a cookie cutter or a knife to lightly score rings or swirls into the top of the cookie topping to resemble conch shells. Let buns rise in a warm place for approximately 40 minutes. 
  4. Preheat oven to 375 degrees F. Bake buns for 18-20 minutes until lightly brown on the bottom.


Tuesday, May 16, 2017

Blue Sprinkle Cake Pops

Blue Sprinkle Cake Pops
Remember those cute little elephant cake pops that I made a few weeks ago? Well, I only made a couple dozen of them so I had a lot of balls of cake dough leftover. I stuck them in the freezer for just such an occasion as this.

When Mike said that his work was having a potluck, I knew that I wanted to make something with those frozen call balls. I looked online to see if I saw some easy cake balls that would work for Cinco de Mayo, but nothing really stood out to me. So, I just ended up using the rest of the leftovers from the elephant cake pops to make these cute and easy blue sprinkle cake pops. I used the leftover blue candy melts that I'd used for the elephant ears.

Cake Pops with Sprinkles

Making Cake Pops with Frozen Cake Dough Balls

Step 1 - Let frozen cake balls thaw in the refrigerator for a few hours. I'd frozen my cake balls and then put them into a plastic freezer bag so I just laid the bag flat in the refrigerator to thaw.

Step 2 - Melt a small amount of candy melts in a small container. Dip the lollipop stick into the candy melt then insert it into the bottom of the cake pops. Then put back into the refrigerator to let the candy set up, at least 10 minutes.

Step 3 - Melt the rest of the candy melts in a tall container. I actually use a blender bottle to hold my melted candy melts. It's nice and deep and perfect for dipping.

Step 4 - Dip the cake balls into the melted candy melts and let the excess drip off. I usually tap-tap-tap the stick on the side of the cup to let everything drip back into the container. 

Step 5 - Sprinkle the colorful sprinkles over your cake ball while it's still wet. Make sure you do this over a small bowl so at you can catch the sprinkles that fall off.


Cake Pop Tips!
  • First and foremost, don't use too much frosting in your cake balls. You don't want them to be too wet because they'll be hard to work with.
  • If your cake balls look like they're starting to fall off the stick while you're dipping then, just twirl the cake ball around slowly to try to keep things even.
  • Use a foam block covered in aluminum foil to hold your cake balls upright as they are drying. You can pre-poke holes with a skewer to make it easier to insert the lollipop sticks.

Sunday, May 14, 2017

Mother's Day 2017 - Barbados Coconut Turnovers

Mother's Day 2017 - Barbados Coconut Turnovers
Happy Mother's Day to all the moms out there.

I didn't get to see my mother or my mother-in-law today, but I did get to spend some times with the ones who made me a mother.


We went to lunch after church.


This afternoon, Emily and I worked on an extra credit project for her social studies class. She and a partner had to pick a country and put together a presentation on it and make a specialty dish that the country is known for.

Emily and her partner chose Barbados. Her partner was out of town this weekend so I helped Emily with her dish. She wanted to make Macaroni Pie, but I was not sure if they would have a way to keep it refrigerated at school and then heat it up at the appropriate time so we picked another dish that could be served at room temperature.

We settled on Coconut Turnovers. She had to make enough to serve her entire class so that was a pretty big project. I thought they turned out great though. The bun is really soft with a nice crunch sugary topping and the inside is sweet and warm. YUM!


Barbados Coconut Turnovers Recipe
Adapted from Barbados.org

Dough
  • 2¾ cups all-purpose flour
  • ½ teaspoon salt
  • 4oz cold butter 
  • ¼ cup sugar
  • 4 teaspoons active dry yeast
  • 1 cup warm milk (approx 110-115 degrees F)
  • ⅓ cup sugar water (dissolve sugar in water)
  • Brown sugar
Filling
  • 2 cups grated or shredded coconut (fresh or frozen; NOT dried coconut)
  • ¾ cup white granulated sugar
  • ¼ teaspoon allspice
  • ¼ teaspoon ground cinnamon
  • 1 teaspoon almond extract

Instructions

Mix the flour and salt, then cut in the cold butter until you have a breadcrumb-like consistency.
In a separate bowl, mix the white sugar, yeast and milk.
Combine the wet ingredients with the dry, mixing to form a dough. Transfer the dough to a lightly floured board and knead gently for 1-2 minutes.
Place the dough in a lightly oiled bowl, cover, leave somewhere warm and let rise for about 1 hour (the dough should double in size).
Combine the filling ingredients in a bowl, stirring well so that the sugar begins to dissolve and the mixture is moist. Set aside.
Punch down the risen dough and lightly knead it for a minute. Cut the dough into 20 equal pieces. With each piece, roll into a 3-inch circle, place a heaping tablespoon of the filling in the center; spread the filling out to ½-inch from the edges. Lift one end of the dough to the other, folding and sealing the ends together. Form into a loaf shape.
Place each turnover on a greased or parchment-lined baking sheet, seam-side down. Cover and let rise for 30 minutes.
Brush turnovers with sugar water and sprinkle with brown sugar, then place in an oven preheated to 350F. After 18 minutes, brush again with sugar water, sprinkle with more brown sugar, and allow to bake for another 2-3 minutes. This will help develop a sugary crust. Remove from the oven and cool on racks for 15 minutes.
Turnovers are best eaten warm. 


Cinco de Mayo Cactus Cupcakes

Cinco de Mayo Cactus Cupcakes
Cinco de Mayo was last week, but Mike's work had their Cinco de Mayo potluck earlier this week. I made several things for him to take, including these Cactus Cupcakes. 

Cinco de Mayo Cactus Cupcakes with Flower

I thought they turned out really cute. The cupcakes were vanilla cake with green buttercream frosting. I used a Wilton Dessert Decorator Pro with a small star tip 
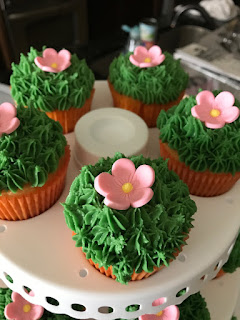
to apply the frosting. Just start in the middle and pipe little stars all around until the cupcake is completely covered. The pink sugar flowers (similar) were something I found at Hobby Lobby. If you don't want to use pre-made flowers, you could pipe pink buttercream in the center and that would be cute, too. I used orange and tan striped cupcake liners to look like terracotta pots. I thought that worked perfectly.

Display of Cactus Cupcakes with Flower

I thought these cactus cupcakes were perfect for a Cinco de Mayo celebration. Mike said everyone at his work really liked them. They had a lot of desserts and he ended up bringing 8 or 9 cakes back home.

I recently got a new cupcake and cake pop display and carrier, and this event was the first time I got to use it. It worked perfectly. It was easy to put the cupcakes into their spots and they didn't move around one I got them in place. I was concerned about how they would travel in the car so I asked Mike to send me a picture of the cupcakes in the carrier when he arrived at work. He indulged me in that and they looked perfect. 


Storing Cupcake Carrier

Sadly, the leftovers did not arrive back home quite as neatly. I guess he was in a hurry to get home because a few of the cupcakes had fallen off their perches onto the tier below. I still think it's a great carrier though. Mike got a lot of questions and compliments on it from people at his work. I'll do a another post to show you all the neat features of the carrier I got.


Friday, May 12, 2017

The Best Cinnamon Rolls With Thick Ooey Gooey Maple Cream Cheese Frosting

The Best Cinnamon Rolls With Thick Ooey Gooey Maple Cream Cheese Frosting
A few months ago, I made a batch of cinnamon rolls for Mike's work. It was a lot of work! I started off using my hand mixer, but the dough was way too much for it. I ended up doing all the kneading by hand. They were good, but it was way too difficult.

After that, I told Mike that if he wanted more cinnamon rolls he was going to have to get me a Kitchenaid mixer. He told me to go get one. So I did. Since then, I've made several batches of cinnamon rolls for different occasions.

Want to see how I make them? I figured you'd want to know. The recipe is below along with some handy tips from me!


    uncooked cinnamon rolls in round cake pans


Yield: 12 large rolls or 24 medium sized rollsPin it

The Best Cinnamon Rolls with Thick Ooey Gooey Maple Cream Cheese Frosting

These cinnamon rolls are so thick and fluffy with delicious cinnamon flavor. And the maple cream cheese frosting just takes these rolls over the top. Don't wait for a special occasion - make these today!

ingredients:

Rolls
    • 2 cups milk 
    • 1/2 cup butter
    • 1/2 cup sugar
    • 1 1/2 teaspoons salt
    • 1 package Active Dry yeast
    • 2 large eggs
    • 6 `1/2 cups all-purpose flour
Filling
    • 1/2 cup butter, softened
    • 1 cup lightly packed brown sugar
    • 1 tablespoon ground cinnamon
Frosting
    • 8 ounces cream cheese
    • 1/4 cup butter
    • 1 teaspoon vanilla
    • 2 teaspoons maple extract
    • Pinch of salt
    • 1 pound powdered sugar
    • 1/4 cup milk or more for consistency

instructions


  1. In a medium sauce pan, add milk, butter, salt and  sugar. Heat until just below the boiling point. When it starts steaming and bubbling around the edges, remove from heat and let cool until approximately 120 degrees F.
  2. Transfer milk mixture to the bowl of your stand mixer fitted with the dough hook attachment and add yeast. Let sit for about 5 minutes until the yeast starts to foam.
  3. Add eggs and mix until combined. Add flour a little at a time until the dough pulls away from the side of the pan. The dough should be soft and only slightly sticky.  Add more flour if needed. Knead for 3 minutes.
  4. Transfer dough to a lightly greased bowl, cover with plastic wrap, and let rise until doubled in size.
  5. Divide the dough in half. Use a rolling pin to roll each half of dough into an 18-inch by 12-inch rectangle. Try to make it as square as possible on the sides. 
  6. Spread one stick of softened butter over each rectangle. Sprinkle with cinnamon and sugar. Pat it lightly with the palm of your hands.
  7. Starting with the long end, roll the dough into a tight log. Pinch the ends together and turn the log over so that the seam is facing down. 
  8. Cut each log in half, then cut each portion in half again, forming four equal sections. Cut each of the four sections in thirds. You will end up with 12 cinnamon rolls from each log. 
  9. Place cinnamon rolls into round four cake pan, two 9X13" pan, or one 11X17" pan or similar that have been sprayed with cooking spray. Cover with plastic wrap then a clean kitchen towel and let rise until double.
  10. Preheat oven to 350 degrees. Bake cinnamon rolls 18-22 minutes until slightly brown on top.
  11. For the frosting, beat together the cream cheese and butter until well combined. Add vanilla, maple flavoring, and salt. Mix well. Add in powdered sugar a little at a time. Add milk until desired consistency. Frosting should be thick but pourable. 

notes

  • If I don't have a lot of time, I like to heat my oven to 200 degrees then turn off the heat and put my bowl of dough inside to help it rise faster.
  • You can punch the dough down if it has risen to the top of the bowl, but you're not ready to roll it out yet. Just let it rise again and then go on to the next step.
  • If I'm planning to take the cinnamon rolls somewhere, I usually bake them in disposable round cake plans. You can find these at most grocery stores or you can buy them in bulk on Amazon. I usually fit 6-7 rolls to a pan.
  • If you have some rolls that start to come unrolled when you're slicing and putting them in the pan, it's okay to just tuck the loose end under your cinnamon roll. It will still come out perfect.
  • I like to make this dough in the evening and wait to bake the cinnamon rolls until the morning. I do steps 1-9 the evening before and then cover the pans with foil and put them in the refrigerator overnight. In the morning, I take out the pans and let them warm up on the counter for maybe 30 minutes before I bake them (remove foil before baking.) You can stack the round cake pans in the refrigerator, too. I think it helps ensure the cinnamon rolls will be even in height.
  • I also make the frosting the night before and just put it into a gallon sized zip top baggie. I put the bag of frosting in the refrigerator overnight and then just snip off the corner and pipe the frosting onto the cinnamon rolls after they bake.
  • These cinnamon rolls freeze well. After they have been frosted, let them cool and then put each cinnamon roll into a separate quart sized freezer bag. Or you can put several together in one bag. When you get ready to use them, just pull them out of the bag frozen and heat them in the microwave.
  • If you like bigger cinnamon rolls, you can skip the step where you half the dough and just make one 18-inch X 12-inch rectangle out of the dough. This would make 6 large cinnamon rolls.
  • I've tried to double this recipe a couple times, but the dough is too much for my mixer to handle and it gets all stuck in the motor. If you want more dough, just mix up a second batch.

I love making the big, thick fluffy rolls. They are so delicious, but it's way too much for most people to eat.

huge cinnamon rolls on baking pans

They look great and would be wonderful if you want to impress somebody. You can make them for bake sales or people with big appetites.

huge frosted cinnamon rolls on baking pans

Or you can just eat them all up. Or freeze them. Or just eat them. 

Tuesday, May 9, 2017

How to Make an Edible Animal Cell Cake

How to Make an Edible Animal Cell Cake
Several weeks ago, Emily had the opportunity to make a cell cake for extra credit in her science class. It could be made of any food as long as it was all edible and large enough to feed half of her class.

She chose to make an animal cell cake, which is round. We did a lot of research on the internet to get some ideas for what to use for different parts of the cake.

Edible Animal Cell Cake

Emily wanted to look like the cell was cut open so we baked one cake in a large round baking pan and another cake in a large glass bowl to make a dome for the top of the cell. We cut off some dome cake so that we can add in all of our cell parts. 

Edible Animal Cell Cake

Here are the items we used for different parts of the animal cell:

Yellow frosting - Cytoplasm
Orange frosting - Cell membrane (add red food coloring to the yellow frosting to make things easy on yourself)
White candy melts - Ribosomes
Airhead Extreme candy belts - Golgi body
Large round lollipop - Nucleus
Sour gummy worms - Rough ER
Red Mike & Ike - Smooth ER
Orange frosting - Nuclear membrane (put some frosting in a plastic baggie and snip off the end to pipe the frosting around the nucleus)
Red gummy bears - Mitochondria
White jelly beans - Vacuole

If you try it, let me know how it goes for you.

Friday, April 28, 2017

Elephant Cake Pops - Let's Talk About the Elephant in the Room

Elephant Cake Pops - Let's Talk About the Elephant in the Room

Elephant Cake Pops - How to make Elephant Cake Pops

How to make Elephant Cake Pops

Edited: I edited this post to add information about how to make the grey color of the elephants.

One of the things Emily and I made for the baby shower was these cute elephant cake pops.

I definitely need to work on quality control if I ever do this project again, but everyone seemed to like them.

I followed these instructions that I found online. She had a very good tutorial on the process.

The ears are blue candy melts. The trunk is made from the same candy melt that has been trimmed down to a trunk shape.  The feet are dehydrated marshmallows. The heart on the nose is a heart-shaped sprinkle. 


The Feet

Let's talk about the feet for a minute. Back around Christmas, I'd seen some Jet Puffed Mallow Bits dehydrated mini marshmallows in a cute little container. But I could not find them anywhere in the store. And they were sold out or extremely expensive anywhere I found them online. So I found another dehydrated marshmallow product on Amazon that was cheaper. I ordered it ... and was very surprised when a 1 pound bag of dehydrated marshmallows showed up at my house. Anybody have suggestions on ways I can use about a million dehydrated mini marshmallows?

The other thing I wanted to say about the dehydrated mini marshmallow feet was that when I got them out of the bag and started working with, they rehydrated very quickly and began to stick to everything. So you might want to just get a few out at a time. You also have to make sure you adhere the marshmallow feet to the cake ball using melted candy before you dip the elephant into the melted candy. 


The Trunk 

I used a small metal decorating tip 
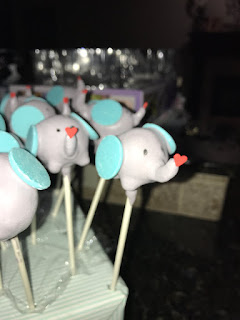
to cut the candy melts into the shape of a trunk. I was able to get about two trunks out of each candy disk. I used the exact same blue candy melt discs that I used for the ears. These are the blue candy melt discs that I used. I bought two packages and had one leftover. I only made about 24 cake pops though. Actually, I made probably twice that many balls, but only dipped 24 of them. Anyway, you will want to dip the trunk into candy melts and push it into the cake ball before you dip the entire elephant in the melted candy. 


The Heart

I think the red heart is one thing that wins these elephant cake pops. I used these red heart sprinkles. They were the perfect size. 


The Eyes

I ordered these edible markers online to use for the eyes. I had a very hard time getting them to write and so some of my elephant eyes were pretty messy and uneven. I still don't know what I did wrong there, unless the markers were not made to write on candy melts. 

The Grey Color

The grey color of the elephants was made by mixing 1 part black candy melts with 3 parts white 


Some of my elephants started to droop on the stick while they were drying. I think these were ones that did not get a good amount of candy melts between the stick and the cake ball. You should let the candy melts pool around the stick a little bit so that the cake ball doesn't move or come off the stick.

I am probably doing a terrible job explaining, but just look at the tutorials that are online and you will get the idea.

Also, be prepared to be in the kitchen for a while because it's definitely a process to get them all decorated up. But I think it was worth the effort!


Friday, April 21, 2017

Easter Breakfast: Fruit Pizza

Easter Breakfast: Fruit Pizza
On Easter morning, we had fruit pizza for breakfast. This recipe is so easy to make ahead and is really delicious and cute. 

Fruit Pizza

Here's the recipe I used.

Ingredients:

  • 2 rolls refrigerated sugar cookie dough
  • 8 oz cream cheese
  • 1 1/2 cups powdered sugar
  • Small tub Cool Whip, 8 oz
  • Assorted fruit
  • 1 cup fruit juice
  • 3/4 cup sugar
  • 3 tsp cornstarch


Spread 2 rolls refrigerated sugar cookie dough into a sheet pan. Bake for approximately 14 minutes until the cookie crust is slightly browned. Let cool.

In a small bowl, combine the cream cheese and powdered sugar. Add Cool Whip.  Spread over cooled crust.

Top with fruit. I used bananas, strawberries, blueberries, peaches and kiwi. You can use pretty much any fruit that you like, either fresh or canned. I used canned peaches and everything else was fresh.

Glaze: In a small saucepan over medium heat, combine fruit juice, sugar, and cornstarch. Whisk until mixture comes to a boil and thickens a bit. Spoon over fruit pizza.

Refrigerate overnight or until ready to serve.

This recipe can be customized to your liking. I accidentally picked up one roll of sugar cookie dough and one roll of chocolate chip cookie dough so I just used what I had.  It was still good.


Tuesday, April 18, 2017

Easter Nest Cake

Easter Nest Cake

Last week, I had Easter on my mind so I made this cute Nest Cake.  I loosely followed this recipe that I found online.  I made mine with a lemon bundt cake and cream cheese frosting.

I filled my nest cake with Robin's Eggs and peanut butter M&M's eggs.

Noah doesn't particularly like coconut so he mostly ate the candy, but everyone else liked it.


Monday, April 17, 2017

Easter Bunny Racers

Easter Bunny Racers
In my Sunday School class, we made some Easter Bunny Racers for a craft/snack. They are so easy and so cute! The hardest part for the kids was not cutting the Twinkie all the way through. I used a can of vanilla frosting to hold the wheels (mini oreos) and the steering wheel (pretzel) in place. And they only have to look cute for about a minute before you eat them.


We some leftover parts so the kids got to make some at home, too.


See? I told you they don't last long!


Yum!

Tuesday, July 19, 2016

Goofy Kids and Skillet Cookies

Goofy Kids and Skillet Cookies
This weekend, we went to Toby Keith's restaurant for lunch.  They have benches that are made from the tailgate of older model trucks.  Noah loves these things.  He always hops up on them and says "Take my picture!"

I got Emily to sit beside him, but couldn't get them to take a decent picture.  It's not that difficult to take a nice picture, is it?


Tonight for supper, we made a skillet cookie.

I mean we made supper.  Then had a skillet cookie for dessert.  You know those skillet cookies they serve in family restaurants where they just put a couple scoops of ice cream into the skillet with the hot cookie and serve it with chocolate syrup drizzled over the top?  I thought about just putting a couple scoops of ice cream in with my cookie, but I didn't figure we could would eat it all and I didn't want to waste the cookies.

M&M Skillet Cookie

1 cup margarine, softened
1/2 cup granulated sugar
1 cup packed brown sugar
2 eggs
1 tsp vanilla extract
2 1/2 cups all purpose flour
1 tsp baking soda
1/2 tsp salt
1 cup semi-sweet chocolate chips
1/2 cup M&M's

Preheat oven to 325 degrees.

Cream together butter and sugar until light and fluffy.  Add eggs and vanilla and beat well.  Slowly add dry ingredients and mix.  Stir in chocolate chips and M&M's.

Spread half the cookie dough into a well greased oven safe skillet. Bake 30 minutes or until light brown and set in the middle.  Bake time will vary depending on the size of your skillet.  I use a 9" cast iron skillet and it takes about 30 minutes to bake.

Save the other half of the cookie dough for another day - wrap well and store in the refrigerator.


You might be wondering where the picture of the fully cooked cookie would be?  Well, who has time to think about taking picture when you're staring a yummy M&M skillet cookie in the face?  NOT ME!

Have you heard all the recent warnings about not eating uncooked cookie dough?  I thought it was due to the raw eggs in the cookie dough, but now they're saying it's also because there could be bacteria in the flour.  It's always something, isn't it?


Related Posts Plugin for WordPress, Blogger...