Showing posts with label Dessert. Show all posts

Friday, May 26, 2017

Red Apple Cake Pops

Red Apple Cake Pops
I know that school is out for the summer, but I wanted to share another thing that Emily and I made for Teacher Appreciation week.

One of the PTA special activities as a treat day for the teachers where people could bring sweet treats and baked goods. Emily and I searched the internet for some teacher-related goodies and we ended up finding these red apple cake pops. They are so cute! I know I say that all the time about the stuff I make, but look at these! They are sooooo cute!


The stems are broken pretzel rods. My tip is to break the pretzel rods pretty small and just lightly place them into the red candy coating, don't try to jam them down into the actual cake ball. If you press the pretzel rod pieces into the actual cake ball, you'll likely get some of the cake ball showing through around the "stem". My cake was a nice dark chocolate so it looked like I had some bad apples.


The green "leaves" are green Tic Tacs. I used wintergreen Tic Tacs. They looked cute, but they were not great to bite into when you're eating a cake pop. If I make these again, I will probably find something different to use for the leaves, maybe some large leaf sprinkles


A lot of my apple cake pops cracked. I think it's because I inserted the sticks then put the tray of cake pops into the refrigerator for about a half hour. I think cold cake pops are a problem and they should be dipped at room temperature. 


I individually wrapped the cake pops and then put them into a little cardboard tray that I found at Hobby Lobby.


Then I wrapped the whole tray of apple cake pops in cellophane and tied a nice red shiny bow on it. Ya'll, I need serious help with my bow tying. They never end up straight or pretty. 


I've appreciated Emily and Noah's teachers so much this year. They have done a lot of the kids and I hope they have a great summer. It will probably take them that long to recover. Ha ha.

Saturday, May 20, 2017

Mexican Conchas (Sweet buns)

Mexican Conchas (Sweet buns)
When I was looking for some Mexican-inspired desserts for Mike's potluck, I ran across a recipe for Mexican Conchas. Have you ever heard of these? They are sweet buns. They looked so cute and fairly easy to make so I decided to go for it.


I love the shell designs on top and also the colorful topping. That is not something you see everyday.


Emily and I have really gotten a lot of use out of the new Kitchenaid mixer. We've made a lot of yeast dough recipes lately. And frosting. And some cookies. And on and on. 

What should we make next?


Yield: 16 bunsPin it

Mexican Conchas Sweet Bread

Mexican Conchas are traditionally found in Mexican markets and are named for the shape of their topping, which looks much like a shell. Use your imagination to come up with the shell designs. Perfect for Cinco de Mayo celebrations.
prep time: 2 hourcook time: 20 MINStotal time: 2 hours and 20 mins

ingredients:

Sweet Buns
  • 1 package active dry yeast
  • 1/2 cup warm water (110 - 115 degrees F)
  • 1/2 cup lukewarm milk (110 - 115 degrees F)
  • 1/3 cup granulated sugar
  • 1/3 cup butter, room temperature
  • 1 tsp salt
  • 1 egg
  • 3 1/2 cups all purpose flour
Sugar Cookie Topping
  • 1/3 cup granulated sugar
  • 1/4 cup margarine
  • 1/2 tsp vanilla
  • 1/2 cup all purpose flour
  • gel food coloring

instructions

To Make the Buns
  1. Dissolve yeast in warm water in the bowl of stand mixer. Add milk sugar, butter, salt egg, and 2 cups of flour. Stir together until well combined. 
  2. Switch to the dough hook attachment and add the rest of the flour. Knead on medium speed for 3 minutes until the dough pulls away from the side of the bowl. Add more flour, if needed. 
  3. Place the dough in a large, oiled bowl and turn the dough over to coat both side. Cover with greased plastic wrap and place in warm place to rise until doubled in size. 
To Make the Sugar Cookie Topping
  1. beat the sugar, margarine and vanilla until light and fluffy. Add flour and mix until thick. Divide dough into three equal pieces and place each piece in a plastic sandwich bag. Add a few drops of food coloring gel and squish the dough until evenly colored. You may need to add more flour if the dough is too soft.
  2. When the dough has risen, divide it into 16 even pieces. Form each piece of dough into a bun by tucking the corners under. (Do not roll between palms because this will make the dough tough.) Place the buns onto a baking sheet lined with parchment paper. 
  3. Take the sugar cookie topping and divide into 16 even pieces. Take each piece of dough and press it between your palms until it forms a cookie disc shape. Moisten one side slightly and place it on top of each bun, wet side down. This will help the topping adhere to the bun. Use a cookie cutter or a knife to lightly score rings or swirls into the top of the cookie topping to resemble conch shells. Let buns rise in a warm place for approximately 40 minutes. 
  4. Preheat oven to 375 degrees F. Bake buns for 18-20 minutes until lightly brown on the bottom.


Tuesday, May 16, 2017

Blue Sprinkle Cake Pops

Blue Sprinkle Cake Pops
Remember those cute little elephant cake pops that I made a few weeks ago? Well, I only made a couple dozen of them so I had a lot of balls of cake dough leftover. I stuck them in the freezer for just such an occasion as this.

When Mike said that his work was having a potluck, I knew that I wanted to make something with those frozen call balls. I looked online to see if I saw some easy cake balls that would work for Cinco de Mayo, but nothing really stood out to me. So, I just ended up using the rest of the leftovers from the elephant cake pops to make these cute and easy blue sprinkle cake pops. I used the leftover blue candy melts that I'd used for the elephant ears.

Cake Pops with Sprinkles

Making Cake Pops with Frozen Cake Dough Balls

Step 1 - Let frozen cake balls thaw in the refrigerator for a few hours. I'd frozen my cake balls and then put them into a plastic freezer bag so I just laid the bag flat in the refrigerator to thaw.

Step 2 - Melt a small amount of candy melts in a small container. Dip the lollipop stick into the candy melt then insert it into the bottom of the cake pops. Then put back into the refrigerator to let the candy set up, at least 10 minutes.

Step 3 - Melt the rest of the candy melts in a tall container. I actually use a blender bottle to hold my melted candy melts. It's nice and deep and perfect for dipping.

Step 4 - Dip the cake balls into the melted candy melts and let the excess drip off. I usually tap-tap-tap the stick on the side of the cup to let everything drip back into the container. 

Step 5 - Sprinkle the colorful sprinkles over your cake ball while it's still wet. Make sure you do this over a small bowl so at you can catch the sprinkles that fall off.


Cake Pop Tips!
  • First and foremost, don't use too much frosting in your cake balls. You don't want them to be too wet because they'll be hard to work with.
  • If your cake balls look like they're starting to fall off the stick while you're dipping then, just twirl the cake ball around slowly to try to keep things even.
  • Use a foam block covered in aluminum foil to hold your cake balls upright as they are drying. You can pre-poke holes with a skewer to make it easier to insert the lollipop sticks.

Sunday, May 14, 2017

Mother's Day 2017 - Barbados Coconut Turnovers

Mother's Day 2017 - Barbados Coconut Turnovers
Happy Mother's Day to all the moms out there.

I didn't get to see my mother or my mother-in-law today, but I did get to spend some times with the ones who made me a mother.


We went to lunch after church.


This afternoon, Emily and I worked on an extra credit project for her social studies class. She and a partner had to pick a country and put together a presentation on it and make a specialty dish that the country is known for.

Emily and her partner chose Barbados. Her partner was out of town this weekend so I helped Emily with her dish. She wanted to make Macaroni Pie, but I was not sure if they would have a way to keep it refrigerated at school and then heat it up at the appropriate time so we picked another dish that could be served at room temperature.

We settled on Coconut Turnovers. She had to make enough to serve her entire class so that was a pretty big project. I thought they turned out great though. The bun is really soft with a nice crunch sugary topping and the inside is sweet and warm. YUM!


Barbados Coconut Turnovers Recipe
Adapted from Barbados.org

Dough
  • 2¾ cups all-purpose flour
  • ½ teaspoon salt
  • 4oz cold butter 
  • ¼ cup sugar
  • 4 teaspoons active dry yeast
  • 1 cup warm milk (approx 110-115 degrees F)
  • ⅓ cup sugar water (dissolve sugar in water)
  • Brown sugar
Filling
  • 2 cups grated or shredded coconut (fresh or frozen; NOT dried coconut)
  • ¾ cup white granulated sugar
  • ¼ teaspoon allspice
  • ¼ teaspoon ground cinnamon
  • 1 teaspoon almond extract

Instructions

Mix the flour and salt, then cut in the cold butter until you have a breadcrumb-like consistency.
In a separate bowl, mix the white sugar, yeast and milk.
Combine the wet ingredients with the dry, mixing to form a dough. Transfer the dough to a lightly floured board and knead gently for 1-2 minutes.
Place the dough in a lightly oiled bowl, cover, leave somewhere warm and let rise for about 1 hour (the dough should double in size).
Combine the filling ingredients in a bowl, stirring well so that the sugar begins to dissolve and the mixture is moist. Set aside.
Punch down the risen dough and lightly knead it for a minute. Cut the dough into 20 equal pieces. With each piece, roll into a 3-inch circle, place a heaping tablespoon of the filling in the center; spread the filling out to ½-inch from the edges. Lift one end of the dough to the other, folding and sealing the ends together. Form into a loaf shape.
Place each turnover on a greased or parchment-lined baking sheet, seam-side down. Cover and let rise for 30 minutes.
Brush turnovers with sugar water and sprinkle with brown sugar, then place in an oven preheated to 350F. After 18 minutes, brush again with sugar water, sprinkle with more brown sugar, and allow to bake for another 2-3 minutes. This will help develop a sugary crust. Remove from the oven and cool on racks for 15 minutes.
Turnovers are best eaten warm. 


Cinco de Mayo Cactus Cupcakes

Cinco de Mayo Cactus Cupcakes
Cinco de Mayo was last week, but Mike's work had their Cinco de Mayo potluck earlier this week. I made several things for him to take, including these Cactus Cupcakes. 

Cinco de Mayo Cactus Cupcakes with Flower

I thought they turned out really cute. The cupcakes were vanilla cake with green buttercream frosting. I used a Wilton Dessert Decorator Pro with a small star tip 
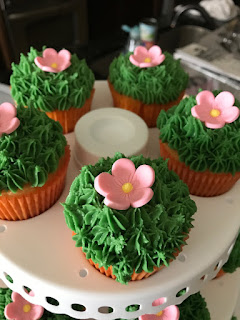
to apply the frosting. Just start in the middle and pipe little stars all around until the cupcake is completely covered. The pink sugar flowers (similar) were something I found at Hobby Lobby. If you don't want to use pre-made flowers, you could pipe pink buttercream in the center and that would be cute, too. I used orange and tan striped cupcake liners to look like terracotta pots. I thought that worked perfectly.

Display of Cactus Cupcakes with Flower

I thought these cactus cupcakes were perfect for a Cinco de Mayo celebration. Mike said everyone at his work really liked them. They had a lot of desserts and he ended up bringing 8 or 9 cakes back home.

I recently got a new cupcake and cake pop display and carrier, and this event was the first time I got to use it. It worked perfectly. It was easy to put the cupcakes into their spots and they didn't move around one I got them in place. I was concerned about how they would travel in the car so I asked Mike to send me a picture of the cupcakes in the carrier when he arrived at work. He indulged me in that and they looked perfect. 


Storing Cupcake Carrier

Sadly, the leftovers did not arrive back home quite as neatly. I guess he was in a hurry to get home because a few of the cupcakes had fallen off their perches onto the tier below. I still think it's a great carrier though. Mike got a lot of questions and compliments on it from people at his work. I'll do a another post to show you all the neat features of the carrier I got.


Related Posts Plugin for WordPress, Blogger...