Tuesday, May 23, 2017

Promotion Sunday and Yard Yahtzee

Promotion Sunday and Yard Yahtzee
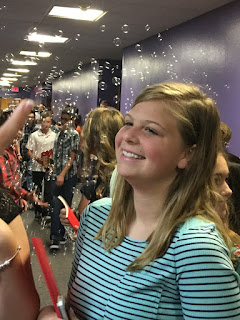
This year is just a big transitional year for Emily because she'll be going to junior high school next year. She also promoted to the youth group at church on Sunday morning. The children's area had a big send off for the 6th graders and parents were invited for the festivities. 

The children's ministry had a prayer time and gave each 6th grader a journal so that they could "write their own story" as they grow and move on into junior high and then high school.

Then all the students lined the hallway and blew bubbles and cheered as the 6th graders walked through. 


Here's a short video of Emily going through the bubbles.


Once the kids got to the end of the hallway, they went through a set of security doors and some of the youth kids were waiting to shoot them with silly string.  They made a huge mess!

Then we all went to the youth area where we had a breakfast and a little orientation time.

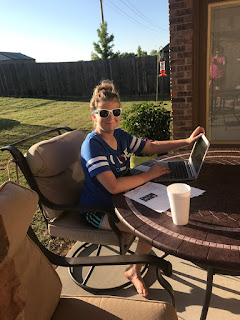
Wasn't the weather beautiful today?

After supper tonight, we went outside to play Yard Yahtzee. 


I got these big wooden dice to play with outside this summer, but this was the first time we'd actually played a game with them. Apparently, Emily and Noah have never played Yahtzee before so we had to have a lesson as we played.


We had a lot of fun though. Noah was hilarious. I'd bought this little basket at the dollar store to use as our "dice shaker" and Noah had a hard time pouring the dice out of the basket. 


What other dice games can we play outside? I know that Farkle is a dice game, but I haven't figured out exactly how to play it yet. We googled it, but didn't have time to really sit and figure it out.


I bought some extra Yahtzee score sheets and Farkle score sheets to use with our games. I think that's going to make things easier, especially with kids.


What are some other summer fun games that your family enjoys?


Monday, May 22, 2017

Emily's Piano Recital

Emily's Piano Recital
Emily's piano recital was on Saturday afternoon. She played "Silver Moon Boat," a Chinese folk melody, and she did really well. She really enjoys playing the piano and it's easy to tell that she's improving every year.


You can watch her performance in this YouTube video.


After the recital, everyone brings goodies to share. Emily and I made some cake pops to take to the recital.


This time, we made chocolate cake pops. I just used some leftover candy coating that I had and decorated them with sprinkles. Last time I made cake pops, a lot of them cracked. But this time, I did not refrigerate the cake pops and none of them cracked. Perhaps that's the trick?


This was the first time I got to use my cupcake/cake pop carrier for cake pops and it worked out perfectly. I just put the lid on to transport them, then took off the lid for serving.


Noah's Life, as told by Noah

Noah's Life, as told by Noah
Hi. I'm Noah. Do you want to learn about my life? Well, here's one now.

I was born August 6th, 2010 in the old house, so old. My room was Noah's Ark and it was good. I liked that it was perfect. And so I kept growing and then I'm here.


We moved to a new house when I was three years old. My new room is decorated with soccer balls and stuff. My bedspread has soccer stuff on it and I have two pillows that look like soccer balls. Even my sheets have soccer balls on them!


Sunday, May 21, 2017

Emily's 6th Grade Graduation

Emily's 6th Grade Graduation
Emily's 6th grade graduation ceremony was Friday morning. 


It was rescheduled from Thursday night due to weather. The school had booked a different venue for Thursday night, but since it was on Friday morning it had to be in the school cafeteria. And it was a standing room only crowd full of friends and family.


Emily received several award.
  • Perfect attendance
  • Honor Choir
  • CubCo (Student Council, 1st grade rep)
  • Silver award for all A's & B's


Her teacher had put together a slideshow of pictures from their 6th grade year. At the end, she showed each student's baby picture then their 6th grade yearbook picture. It was a really cute video.


I got Noah out of class so that he could attend the graduation ceremony with me. We were sitting way in the back and he had a hard time seeing the kids on the stage and the video. He did see the picture of Emily on the screen though. He said that her baby picture was SO CUTE. Yes, it was. 


After the ceremony, they had cake and punch for everyone. It was a really fun time at the school. Next year, Emily will be going to Jr. High!


Saturday, May 20, 2017

Mexican Conchas (Sweet buns)

Mexican Conchas (Sweet buns)
When I was looking for some Mexican-inspired desserts for Mike's potluck, I ran across a recipe for Mexican Conchas. Have you ever heard of these? They are sweet buns. They looked so cute and fairly easy to make so I decided to go for it.


I love the shell designs on top and also the colorful topping. That is not something you see everyday.


Emily and I have really gotten a lot of use out of the new Kitchenaid mixer. We've made a lot of yeast dough recipes lately. And frosting. And some cookies. And on and on. 

What should we make next?


Yield: 16 bunsPin it

Mexican Conchas Sweet Bread

Mexican Conchas are traditionally found in Mexican markets and are named for the shape of their topping, which looks much like a shell. Use your imagination to come up with the shell designs. Perfect for Cinco de Mayo celebrations.
prep time: 2 hourcook time: 20 MINStotal time: 2 hours and 20 mins

ingredients:

Sweet Buns
  • 1 package active dry yeast
  • 1/2 cup warm water (110 - 115 degrees F)
  • 1/2 cup lukewarm milk (110 - 115 degrees F)
  • 1/3 cup granulated sugar
  • 1/3 cup butter, room temperature
  • 1 tsp salt
  • 1 egg
  • 3 1/2 cups all purpose flour
Sugar Cookie Topping
  • 1/3 cup granulated sugar
  • 1/4 cup margarine
  • 1/2 tsp vanilla
  • 1/2 cup all purpose flour
  • gel food coloring

instructions

To Make the Buns
  1. Dissolve yeast in warm water in the bowl of stand mixer. Add milk sugar, butter, salt egg, and 2 cups of flour. Stir together until well combined. 
  2. Switch to the dough hook attachment and add the rest of the flour. Knead on medium speed for 3 minutes until the dough pulls away from the side of the bowl. Add more flour, if needed. 
  3. Place the dough in a large, oiled bowl and turn the dough over to coat both side. Cover with greased plastic wrap and place in warm place to rise until doubled in size. 
To Make the Sugar Cookie Topping
  1. beat the sugar, margarine and vanilla until light and fluffy. Add flour and mix until thick. Divide dough into three equal pieces and place each piece in a plastic sandwich bag. Add a few drops of food coloring gel and squish the dough until evenly colored. You may need to add more flour if the dough is too soft.
  2. When the dough has risen, divide it into 16 even pieces. Form each piece of dough into a bun by tucking the corners under. (Do not roll between palms because this will make the dough tough.) Place the buns onto a baking sheet lined with parchment paper. 
  3. Take the sugar cookie topping and divide into 16 even pieces. Take each piece of dough and press it between your palms until it forms a cookie disc shape. Moisten one side slightly and place it on top of each bun, wet side down. This will help the topping adhere to the bun. Use a cookie cutter or a knife to lightly score rings or swirls into the top of the cookie topping to resemble conch shells. Let buns rise in a warm place for approximately 40 minutes. 
  4. Preheat oven to 375 degrees F. Bake buns for 18-20 minutes until lightly brown on the bottom.


Friday, May 19, 2017

Ocean Biome in a Shoebox

Ocean Biome in a Shoebox
The other week, Emily had to make an ocean biome in a shoebox for her science class. She put a lot of thought into how she wanted her biome to look and I thought it turned out really neat. It even had a stingray that moved!

In case you're curious, these are the supplies that we used and how we put it together.

Ocean biome in a box

For the box, we just used a cardboard shipping box. I cut the flaps off. The first thing we did was cover the outside with colorful wrapping paper so that the box would look "finished" on the inside as well as the outside. Just wrap it like you would wrap a gift and tuck the ends of the paper inside the box. The inside of the box will get covered up so it doesn't have to look neat.

Next, Emily took some printed scrapbooking paper that had a water pattern on it. We got two pieces of 12X12 paper and we needed probably twice that much. We could only cover the back and sides of our box, but not the top or the bottom. We just used white printer paper for the top and bottom. Just fold the paper and glue it down with white school glue.

For the coral reef on the left side of the box, I printed a picture of some coral off the internet and pasted it to a small piece of cardboard. Then Emily cut the cardboard/picture and pasted it onto the bottom of the box. We had gotten some small plastic ocean animals from Hobby Lobby as well as some small fake plants. These are sold in the hobby section of the store and are things that are used to make miniature models and things like that. 

The animals that we got were made of a squishy plastic, sort of like a pencil eraser. Since they were soft, I was able to use a needle to thread a piece of fishing line through the back of the animal so that we could suspend them in the box to make them look like they're swimming. 

The "sand" at the bottom of the ocean is actually brown sugar that we glued to the box with white school glue. We also added some pieces of cardboard to make the ocean floor look uneven. We attached some turtles to the seafloor using hot glue as well. We made the mistake of trying to hot glue the turtle to the floor after we'd put on the sand, but the turtle kept falling off. We eventually had to scrape some of the sand/brown sugar and hot glue the turtle down and then add more brown sugar around it. So, don't do like us and make sure you attach your animals before you add the sand. 


Suspended animals in a biome box

Another fun thing that Emily wanted to do was make a stingray that could cruise across the ocean floor. I cut a slit into the top of our box to facilitate this. I used the needle and fishing line to attach the stingray, then tied the finishing line through the holes of a large button. Then we threaded the stingray through the slit in the top of the box. The problem was that the thin fishing line would not travel smoothly through the slit in the box. So, we added a small safety pin that would add more stability as it slid down the slit in the box. We also put scotch tape all along both sides of the slit in the box to help the safety pin move more smoothly. This did the trick! We used hot glue to attach a starfish to the top of the button.


Moveable animals in a biome box

All the kids in Emily's class thought it was pretty cool that her stingray moved. That little button contraption has gotten a lot of use and is still going strong. (Perhaps I should sell it on EBAY? I could probably get a lot of money for it!) She said that none of the other kids had animals that moved in their biome box. 


Thursday, May 18, 2017

Oklahoma Weather

Oklahoma Weather
Today was one of those infamous Oklahoma spring storms. The weathermen have been talking about this day for a week.

In our area, it wasn't that bad. We got some rain and some high wind and very little hail. Some other areas in Oklahoma got the dangerous storms and tornadoes.

I thought it was funny that all of us took pictures of clouds today.


Mike's early morning picture west of our house
Oklahoma Clouds


When I was on my way to the bus stop this afternoon to get the kids, I took this picture of the clouds
Mammatus Clouds in Oklahoma

When I saw Emily, she was taking this picture of the same clouds
Mammatus Clouds in Oklahoma

We are supposed to get more storms tomorrow so we'll have to be weather-aware again. We do have a storm shelter in the garage so we'll be safe no matter what comes our way. 

Tuesday, May 16, 2017

Blue Sprinkle Cake Pops

Blue Sprinkle Cake Pops
Remember those cute little elephant cake pops that I made a few weeks ago? Well, I only made a couple dozen of them so I had a lot of balls of cake dough leftover. I stuck them in the freezer for just such an occasion as this.

When Mike said that his work was having a potluck, I knew that I wanted to make something with those frozen call balls. I looked online to see if I saw some easy cake balls that would work for Cinco de Mayo, but nothing really stood out to me. So, I just ended up using the rest of the leftovers from the elephant cake pops to make these cute and easy blue sprinkle cake pops. I used the leftover blue candy melts that I'd used for the elephant ears.

Cake Pops with Sprinkles

Making Cake Pops with Frozen Cake Dough Balls

Step 1 - Let frozen cake balls thaw in the refrigerator for a few hours. I'd frozen my cake balls and then put them into a plastic freezer bag so I just laid the bag flat in the refrigerator to thaw.

Step 2 - Melt a small amount of candy melts in a small container. Dip the lollipop stick into the candy melt then insert it into the bottom of the cake pops. Then put back into the refrigerator to let the candy set up, at least 10 minutes.

Step 3 - Melt the rest of the candy melts in a tall container. I actually use a blender bottle to hold my melted candy melts. It's nice and deep and perfect for dipping.

Step 4 - Dip the cake balls into the melted candy melts and let the excess drip off. I usually tap-tap-tap the stick on the side of the cup to let everything drip back into the container. 

Step 5 - Sprinkle the colorful sprinkles over your cake ball while it's still wet. Make sure you do this over a small bowl so at you can catch the sprinkles that fall off.


Cake Pop Tips!
  • First and foremost, don't use too much frosting in your cake balls. You don't want them to be too wet because they'll be hard to work with.
  • If your cake balls look like they're starting to fall off the stick while you're dipping then, just twirl the cake ball around slowly to try to keep things even.
  • Use a foam block covered in aluminum foil to hold your cake balls upright as they are drying. You can pre-poke holes with a skewer to make it easier to insert the lollipop sticks.

Monday, May 15, 2017

Growing Up

Growing Up
My Emily is growing up. Can you believe it? Does she not look 17 in this picture?


If you read my last post, you already know that Emily's hibiscus bloomed for the first time today. I showed it to her when she got home and she was really excited. She calls the plant "Hi-Be" and she takes care of it herself. 


Emily's Hibiscus

Emily's Hibiscus
OH MY GOSH YOU GUYS!!! Emily's hibiscus is blooming and it is gorgeous! The picture does not do it justice.

Hibiscus bloom in yellow, orange and pink

I'd gone out to check on it this morning after breakfast and the bloom was maybe 1/4 open. I wish I'd taken a picture of it this morning, but I didn't have my phone with me. I figured I'd show Emily when she got home from school. I went back outside at lunch and the bloom was open and it's huge and so colorful.

Hibiscus in whiskey barrel

There are no less than 17 other buds on the bush right now, including the one in my picture below that will be open before you know it.

Hibiscus bud getting ready to open

Emily is going to be so excited when she gets home!

Sunday, May 14, 2017

Mother's Day 2017 - Barbados Coconut Turnovers

Mother's Day 2017 - Barbados Coconut Turnovers
Happy Mother's Day to all the moms out there.

I didn't get to see my mother or my mother-in-law today, but I did get to spend some times with the ones who made me a mother.


We went to lunch after church.


This afternoon, Emily and I worked on an extra credit project for her social studies class. She and a partner had to pick a country and put together a presentation on it and make a specialty dish that the country is known for.

Emily and her partner chose Barbados. Her partner was out of town this weekend so I helped Emily with her dish. She wanted to make Macaroni Pie, but I was not sure if they would have a way to keep it refrigerated at school and then heat it up at the appropriate time so we picked another dish that could be served at room temperature.

We settled on Coconut Turnovers. She had to make enough to serve her entire class so that was a pretty big project. I thought they turned out great though. The bun is really soft with a nice crunch sugary topping and the inside is sweet and warm. YUM!


Barbados Coconut Turnovers Recipe
Adapted from Barbados.org

Dough
  • 2¾ cups all-purpose flour
  • ½ teaspoon salt
  • 4oz cold butter 
  • ¼ cup sugar
  • 4 teaspoons active dry yeast
  • 1 cup warm milk (approx 110-115 degrees F)
  • ⅓ cup sugar water (dissolve sugar in water)
  • Brown sugar
Filling
  • 2 cups grated or shredded coconut (fresh or frozen; NOT dried coconut)
  • ¾ cup white granulated sugar
  • ¼ teaspoon allspice
  • ¼ teaspoon ground cinnamon
  • 1 teaspoon almond extract

Instructions

Mix the flour and salt, then cut in the cold butter until you have a breadcrumb-like consistency.
In a separate bowl, mix the white sugar, yeast and milk.
Combine the wet ingredients with the dry, mixing to form a dough. Transfer the dough to a lightly floured board and knead gently for 1-2 minutes.
Place the dough in a lightly oiled bowl, cover, leave somewhere warm and let rise for about 1 hour (the dough should double in size).
Combine the filling ingredients in a bowl, stirring well so that the sugar begins to dissolve and the mixture is moist. Set aside.
Punch down the risen dough and lightly knead it for a minute. Cut the dough into 20 equal pieces. With each piece, roll into a 3-inch circle, place a heaping tablespoon of the filling in the center; spread the filling out to ½-inch from the edges. Lift one end of the dough to the other, folding and sealing the ends together. Form into a loaf shape.
Place each turnover on a greased or parchment-lined baking sheet, seam-side down. Cover and let rise for 30 minutes.
Brush turnovers with sugar water and sprinkle with brown sugar, then place in an oven preheated to 350F. After 18 minutes, brush again with sugar water, sprinkle with more brown sugar, and allow to bake for another 2-3 minutes. This will help develop a sugary crust. Remove from the oven and cool on racks for 15 minutes.
Turnovers are best eaten warm. 


Cinco de Mayo Cactus Cupcakes

Cinco de Mayo Cactus Cupcakes
Cinco de Mayo was last week, but Mike's work had their Cinco de Mayo potluck earlier this week. I made several things for him to take, including these Cactus Cupcakes. 

Cinco de Mayo Cactus Cupcakes with Flower

I thought they turned out really cute. The cupcakes were vanilla cake with green buttercream frosting. I used a Wilton Dessert Decorator Pro with a small star tip 
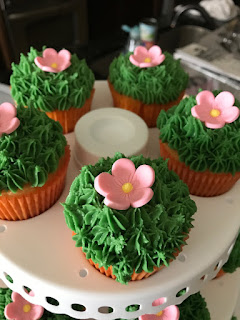
to apply the frosting. Just start in the middle and pipe little stars all around until the cupcake is completely covered. The pink sugar flowers (similar) were something I found at Hobby Lobby. If you don't want to use pre-made flowers, you could pipe pink buttercream in the center and that would be cute, too. I used orange and tan striped cupcake liners to look like terracotta pots. I thought that worked perfectly.

Display of Cactus Cupcakes with Flower

I thought these cactus cupcakes were perfect for a Cinco de Mayo celebration. Mike said everyone at his work really liked them. They had a lot of desserts and he ended up bringing 8 or 9 cakes back home.

I recently got a new cupcake and cake pop display and carrier, and this event was the first time I got to use it. It worked perfectly. It was easy to put the cupcakes into their spots and they didn't move around one I got them in place. I was concerned about how they would travel in the car so I asked Mike to send me a picture of the cupcakes in the carrier when he arrived at work. He indulged me in that and they looked perfect. 


Storing Cupcake Carrier

Sadly, the leftovers did not arrive back home quite as neatly. I guess he was in a hurry to get home because a few of the cupcakes had fallen off their perches onto the tier below. I still think it's a great carrier though. Mike got a lot of questions and compliments on it from people at his work. I'll do a another post to show you all the neat features of the carrier I got.


Saturday, May 13, 2017

Baby Shower Candy Bar Game

Baby Shower Candy Bar Game
One of the games we played at the baby shower was the candy bar game. I don't know if you've ever had the opportunity to play this game before, but it was a lot of fun and sometimes pretty funny.

In the candy bar game, the host says a word or phrase related to pregnancy or parenting and the players have to guess the type of candy bar that best represents this word or phrase. Instead of printing a list of the possible choices, I decided to attach the candy bars to a poster board. I used a stiff poster board that I found at Hobby Lobby. I thought this method worked out really well because people could visually see their options and which choices are still remaining.


Baby Shower Candy Bar Game board

You can find many different lists of phrases and their matching candy bars for this game online, but I will share the list I used below. 

Baby Shower Candy Bar Game Matches:
Daddy at ConceptionBig Hunk
The conceptionSkor
Choosing a baby nameWhatchamacallit
Girl's NameBaby Ruth
Boy NamesMike and Ike
AnesthesiologistMr Goodbar
EpiduralLifesavers
Delivery DoctorButterfinger
Labor and Delivery nursesSweet Tarts
Umbilical cordTwizzlers
Hospital Bill100 Grand
Preemie BabyRunts
Chunky BabyRolo
Diapers, Formula, MedicinePayday
Dirty LaundryMounds
Postpartum BellyJelly Belly
Breast FeedingMilky Way
Dirty DiaperMilk Duds
Time AloneZero
Mommy's Sleep TimeFast Break
LullabiesSymphony
New babyAlmond Joy
TripletsThree Musketeers
TwinsTwix 
Baby LaughsSnickers
Cool MomPeppermint Patty
First year of ParenthoodRocky Road

Some of the candy bars were hard for us to find. I actually put Emily and Mike in charge of finding all the obscure candy bars. They found a lot of them at CVS and Walgreens. You can go on the Walgreens website and look up which stores have certain candy bars. The Big Hunk is one of the candy bars that we had a hard time finding and we finally found on the Walgreens website at a store a few miles away from us. Mike and Noah went there to look for it and they found it right away.

Be sure to pin this so that you can find it later!


The Rocky Road bar was another one that we had trouble with. Mike and Emily eventually found it at a specialty candy store called Lohmann's Good Things in Norman.

This game was a big hit at the baby shower. I'd highly recommend it. Like I said, you can modify the list of candy bars to your liking. There are many choices out there for this game.
Related Posts Plugin for WordPress, Blogger...